Thursday, December 22, 2011

AutomateIt - Cell Id Trigger Guide

Visit our new website at http://www.automateitapp.com

The most requested feature on Vote for feature - Take II was the Cell Id Trigger. Without getting too technical, your device is using cell towers to connect to the cellular network, and as you move from one place to another, the device is connecting to different cells. This trigger monitors the cells your device is connected to, allowing you to define triggers for connecting or disconnecting from cells in desired areas.
The trigger configuration screen has the following settings:
  • Log cells data - When this setting is checked, whenever your device connects to a new cell, it will be logged to the rule log. The log will contain the cell details and an indication whether the rule is active or not.
  • Connected to cell - This setting lets you define whether the trigger will launch when you are connected to one of the defined cells or when you are not connected to any of the defined cells.
  • Location - The dropdown list lets you select a location. a location is a saved set of cells which you can define. When defining your first Cell Id trigger, you don't have any saved locations so you will only be able to select "Custom Location". When you select a location it shows the list of cells which comprise the selected location.
To configure the list of cells, you should click the menu icon to the right of the location selection box, which will show the following menu:
The menu has the following options:
  • Scan cells - The application will start monitoring connected cells, adding all found cells to the list of cells. The scan will continue until you press the "Back" button. Notice that in some areas it could be that there is a large number of cells to scan so it is recommended to try and scan for cells several times during the day until all cells in the area are acquired.
  • Add cell (from recent) - Once you start using the Cell Id Trigger, AutomateIt keeps a log of the recent cells your device was connected to so in case your trigger does not recognize a cell which you want to include in one of your triggers, you can use this option to add the cell from the list of recent cells. When clicking this option, the following list is displayed allowing you to select one or more cells that will be added to your trigger. Each cell shows the time your device was connected to the cell and some information of the connected cell.
  • Add cell (manually) - In addition to the "Scan cells" and "Add cell (from recent)", you can manually add cells. When selecting this option from the menu, you will be required to enter the cell details as follows:
  • Save location - In order for you to be able to define several triggers which relate to the same location (for instance, Arrived home and Left home) you can save the set of cells as a location which will be available for selection using the selection box on the trigger configuration screen (AutomateIt free version only allows saving a single location while the Pro version has no limitation on the number of saved locations). The main advantage of saving locations is if you have more than a single trigger using the same location, updating it through one trigger will affect all triggers using the same location. When a saved location is selected the menu will have two more options:
  • Rename location - That's pretty much self-explanatory...
  • Delete location - This option deletes the saved location but does not remove the cells from trigger.
Each cell displayed has two buttons on the right side allowing you to remove the cell from the trigger or edit its details.

Cell Id Settings
The Cell Id Trigger has some general settings that can be changed using the application settings screen:
  • Trigger when device is asleep - Using this setting you can choose to monitor connected cells even when the device is asleep, otherwise, it will only monitor connected cells when the device screen is on. By default, this setting is set so it will monitor cells even when the device is asleep. Please notice that un-checking this setting will not necessarily prevent your device from checking for cell updates, but it will not enforce it to check for updates every defined interval. In case some other application wakes the device it could be that the trigger will still launch. if you wish to prevent the trigger from executing when device is asleep, I recommend using the Composite AND Trigger available on the Pro version and combine it with a "Screen On Trigger".
  • Cell updates monitoring interval - When the previous setting is set, AutomateIt will check for connected cell on specific time intervals as defined by this setting.
  • Turn screen on for cell update check - This setting determines if when checking for cell updates the device screen will be turned on. For most devices this is not required and by default this will be set to false. If despite the fact you set the "Trigger when device is asleep" setting, the trigger does not launch when the device is asleep, try using this setting.
  • Screen on duration (ms) - When using the "Turn screen on for cell update check" setting, this setting is used to define the screen on duration. By default this is set to 500 milliseconds.
GSM vs. CDMA
Currently (version 1.20.0 or 2.20.0) AutomateIt was only tested for GSM support and has CDMA support as an experimental feature. If you have a CDMA-based device and use this trigger please keep in mind that this was not fully tested and report any errors using the "Help" button on the About screen of the application.

Thursday, September 15, 2011

AutomateIt - Vote for feature - Take II

This is a second round for you, AutomateIt users, to vote for your favorite features for next updates.
Those of you already familiar with the Vote for feature post can go ahead and vote !

The list below was combined from requests I received through emails, comments on this blog, the AutomateIt thread on xda-developers.com and some new ideas that I came up with...

Obviously I can't implement all of those requests so I'm letting you decide which features you would like to see coming in next updates by hitting the "Like" button for your favorite feature(s).

The "Like" count for each feature will have significant impact on the upcoming versions of AutomateIt.

Like it ! Feature
Add Feature: Copy rule
Add Action: Send email (With keywords similar to Send SMS Action)
Add Feature: Contact selection enhancements (Unknown contact, phone number pattern, last caller, last SMS sender, last called phone number, last SMS recipient, choosing a specific phone number for a contact with several numbers)
Add Feature: Main screen UI enhancements (Reorder rules, Group/Sort rules etc.)
Add Action: Reboot
Add Feature: Request user confirmation to execute action (Show dialog to confirm action execution by user before executing, possibly adding countdown to dialog)
Add Feature/Action: Pause between actions in a composite action
Add Trigger: Recurring event (Execute action every defined time interval)
Add Feature: Create reverse rule (Create new rule with reverse trigger and action)
Add Trigger: Cell IDs (determine location by nearby cells)

On top of these features, there is a long list of more features that were already requested and will be considered for upcoming updates (Strikeout text means its already implemented) :
  • Add Trigger: Home screen launched
  • Add Trigger: New email received (specific subject/sender/...)
  • Use locale date and time format instead of fixed format
  • Add Action: Clear notifications
  • Add Trigger: Roaming active/inactive
  • Add Action: Switch 2G/3G (Is it even technically possible ???)
  • Add Action: Screen off/on
  • Add Action: Lock device
  • Add Action: Run shell script
  • Add Action: Custom action - allows plugins that will be developed by other developers to be activated by AutomateIt triggers
  • Add Feature: Add NOT operator for triggers (maybe just to selected triggers...)
  • Add Trigger: Above/Below Speed (using GPS)
  • UI: Improve the way sliders are displayed (for instance - on Set Volume Action settings)
  • Add Action: Toggle auto-answer
  • Add Action: Media play actions
  • Add Feature: Add to Calendar Trigger the ability to trigger some time before a calendar event starts/ends
  • Add Action: SMS Forwarding
  • Add Widget: Show rules list and select rule to execute
  • Have some basic rules pre-installed with AutomateIt
  • Add Feature: Set Sound Mode Action without changing the vibrate settings
  • Add Feature: Save location when rule is triggered (per rule and as a general setting)
  • Add Feature: Show popup setting per rule
  • Add Feature: Add "Call answered" state to Call State Trigger
  • Add Feature: Store favorite locations for Location trigger or use Google Maps favorites (or both...)
  • Add Trigger: Battery Drain - Triggers when battery level drops X% over defined time
  • Add Action: Save current location
  • Add Action: Toast message
  • Add Action: Flash Blink (rate, duration)
  • Add Feature: Integrate TTS for actions (Read last SMS, Say sentence etc..)
  • Add Trigger: Speakerphone turned on/off
  • Add Feature: Save action sets
  • Add Trigger: GPS State
  • Add Action: Change Input Method
  • Add Trigger: Signal level trigger (No signal, low, high...)
  • Add Action: Launch shortcut
  • Add Keyword: Current Time
  • Add Action: Auto-Answer incoming call (Including add to conference call option)
  • Add Feature: Add TTS to the Notification Action
  • Add Action: Mobile Hotspot
  • Add Trigger: Shake Device
  • Add Feature: Require password to change rules
  • Add Action: Execute widget/shortcut
  • Add Trigger: Headset Button Clicked
  • Add Trigger: NFC Trigger
  • Add Action: Take a picture
  • Add Trigger: HDMI connected
  • Add Feature: Add "Vehicle movement" state to sensor trigger for Accelerometer

Wednesday, July 27, 2011

TranslateIt - AutomateIt with your desired language


Visit our new website at http://www.automateitapp.com

Well, it's a small world after all... Lots of users have been requesting to have AutomateIt support different languages (Spanish, Dutch, German, Hebrew, Polish, Russian...) and I would have gladly do it, but there is only one problem - I can't speak all of these languages...
That's where you come in - I thought of an open-source-style-translation-mechanism that will let you, AutomateIt users, participate in the process of translating AutomateIt to your desired language.

How will that work ????
basically I created a few Excel spreadsheets that has all of AutomateIt strings that needs translation and shared those spreadsheets via Google Docs sharing.

All you have to do is open the spreadsheet that has the translation to your language and start translating.

Sounds good ? Great.
BEFORE your start, There are a few guidelines and instructions I'd like you to follow:
  1. Don't use automatic translation tools such as Google Translate. The translation of these tools will most probably provide very poor translation for most cases.
  2. If you don't understand the meaning of a string, don't translate it. Leave it for someone else.
The translation spreadsheets have the following structure (Click on the image to enlarge):
  1. Column A [Category] - A general category used to identify where the string comes from so you'll have some context when translating the string. This column is for information only.
  2. Column B [Array Name] - Some strings are part of a list. In that case, Array name will show the name of the list (See example on rows 747-749 on the image above - list name is widget_config_action). This column is for information only.
  3. Column C [String Id] - The internal Id of the string used by AutomateIt.This column is for information only.
  4. Column D [String Text] - The English text to be translated. This column is for information only.
  5. Column E [String Params Description] Some strings are dynamically built by AutomateIt using pre-defined parameters. These parameters  are represented in the strings (Column D) as %1$s or similar strings (See example on rows 737-739). These parameters MUST be kept when translating to any language. Each parameter meaning is explained in column E. This column is for information only.
  6. Column F - Headers column. Nothing special here...
  7. Column G [Language Name] - This is the ONLY column you should update.
    • Row 1 - Shows the language name
    • Row 2 - Shows the language code
    • Row 3 - Shows statistics of the number of strings translated / Total number of strings
    • Row 4 - Shows statistics of the translated strings percentage out of the total strings
    • Row 5 - Shows the number of invalid strings (See explanation on Column H below)
    • Rows 6-... - This is where the translated text goes. You only need to translate the text from Column D.
  8. Column H [Is Valid] - To assist you with the translation process, and especially with the parameterized string, the "Is Valid" indication will be TRUE for all valid strings and FALSE for invalid strings (Invalid string is a parameterized string that one or more of its parameters is missing). Please make sure that you only enter valid strings since invalid strings will not be used and the original English text will be displayed. This column is for information only
Some strings have HTML tags or URLs embedded as part of the string. When translating those strings (See example on row 753) these tags and URLs MUST be included in the translated string.

Have you read ALL of the instructions ? If there's something that is still not clear, Don't start translating yet.
Since the translation files are shared and you are all able to edit them, please follow these instructions and don't change anything that you are not supposed to or you are not sure that you are supposed to.

Currently, There are spreadsheets ready for the following languages (click on the language name to go to the relevant spreadsheet):


The following table shows the current status of translation per language. Languages with over 90% translation progress are supported by AutomateIt or will be on next update:

Tuesday, May 31, 2011

AutomateIt goes Pro !

Visit our new website at http://www.automateitapp.com

AutomateIt PRO is here at last ! it has all the goods that the free version has and it's an ad-free, popup-free version with some awesome new and advanced features.


The advanced features included in this version are:
  • Composite Triggers - use more than a single trigger for each rule using AND/OR logic between these triggers
  • Composite Action - execute several actions as a result of a single trigger (which can be a composite trigger)
  • Rule Active Period - set an active period for each rule. Really useful if you only want a certain rule to be active only during daytime, weekends, just an hour a day etc.
  • Sensor Trigger - utilize all your device' sensors as a trigger for a desired action. This includes usage of all the sensors supported by Android - Accelerometer, Light, Proximity etc.
  • Calendar Trigger - allows your device to act once a calendar event starts or ends.
  • Enable/Disable Screen Lock Action - Enables or disables your screen lock slide/pattern/password/pin.
  • Cancel delayed execution by trigger - Auto-cancel delayed execution when defined trigger is launched.
  • Recurring Event Trigger - Executes a defined action every defined time interval
  • Copy RuleCreate a new rule, based on an existing one
See ideas for useful rules using these advanced features on this post.

If you are upgrading from the free version, follow these simple steps for an easy upgrade:
  • Backup your existing rules from the main screen menu
  • Uninstall AutomateIt free version
  • Install AutomateIt Pro
  • Restore your backed-up rules
Composite trigger allows you to define a set of triggers that when ALL or ANY of them is set, will trigger the rule. For this functionality we have two new triggers that can be selected - "Composite AND trigger" and "Composite OR Trigger":
Once we select one of those triggers, we can further define the triggers contained in the composite trigger (as usual, press the wrench/screwdriver icon on the edit rule screen after selecting the trigger from the selection list):
When we begin editing the composite trigger we can start adding sub-triggers to it using the "Add Trigger" button (the green plus sign). for this demo we will define a composite AND trigger that has two sub-triggers:
Notice the red "remove" button for each trigger which allows you to remove any sub-trigger.

The trigger we have defined in the image above means that the rule will trigger when battery level drops below 35% AND there is no power connected to the device.

Note: Although in this example we only use two triggers, there is no limit on the number of triggers that can be contained in a single composite trigger.

To complete the demo we will use a Composite Action to execute several actions. First we need to select the "Composite Action" from the Action selection on the edit rule screen:
and then we can begin editing the composite action, in the same way as we did for the composite trigger:
As you can see in the image above, we have defined three sub-actions that will be executed one after another. You can change the order of execution by clicking the up/down arrow buttons.
Note: Although in this example we only use three actions, there is no limit on the number of actions that can be contained in a single composite action.

After saving the rule we have just defined, the main screen will show the details of the defined rule:

Composite OR Trigger
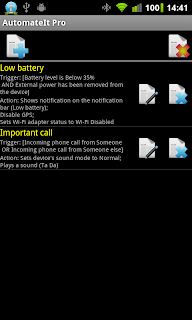
The only difference between "Composite AND Trigger" and "Composite OR Trigger" is that the AND trigger will launch only when ALL the sub-triggers are set, whereas the OR trigger will launch when ANY of its sub-triggers is set. One good usage of that capability could be to execute the same set of actions when there is an incoming call from "someone" OR "someone else" as defined in the following images (take a look at the "Important call" rule):


Hierarchical Composite Triggers
Composite triggers can be used as any other trigger and be contained in another composite trigger. It might complicate things a bit but gives you a lot of flexibility when defining rules. If we will continue with the "Important call" rule, we can define the following hierarchical trigger:
  • Composite AND Trigger
    • Sound Mode Changed Trigger (Silent)
    • Composite OR Trigger
      • Incoming call (Someone)
      • Incoming call (Someone else)

Using this new capability you can set different rules for various times of the day or the week. 
For each rule you define there is a new checkbox on the edit rule screen that by default is marked as "Always Active" (We use the same "Important call" rule defined before):

Once you uncheck this checkbox, you can define specific days of the week and specific hours in which this rule will be active. In this case, we set it to be active on weekdays between 8:00 and 18:00. this is visible both on the edit rule screen and in the description of the rule on the main screen:
In the following screenshot, we changed the rule to be active on weekdays between 8:00 and 14:00 and the screenshot was taken at 14:48 (e.g, the rule is supposed to be Inactive), so the main screen shows us which rules are currently Inactive:
There are some similarities between Inactive and Disabled rules in the sense that they both will not be triggered in case the defined trigger is set, BUT there is an important difference between them - Inactive rules will be automatically activated on the defined time and disabled rules will be activated manually or by using the "Enable/Disable Rule Action". They will also be displayed differently on the main screen:

Sensor trigger allows you to use the built-in sensors that your device has and define rules based on specific sensor states. This trigger can be used with its basic presets (as will be demonstrated here) or can be tweaked by using more advanced customization.
The trigger can be selected like any other trigger on the edit rule screen:
After selecting the "Sensor Trigger" it can be customized using the following screen:
This screen has several fields:
  • Sensor - selection list of all sensors available on your device (name and type of each sensor. Please note that several users have reported that when using the Proximity Sensor, it might have a significant impact on your battery consumption):
  • Sensor State - selection list of presets available for each sensor or advanced customization state (Will be further explained). The following image shows a list of sensor state presets for the Accelerometer sensor.
  • Sensitivity - Since the exact values of each sensor can change by slight deviation, you can define how sensitive to these changes you want your trigger to be.
  • Sampling Rate - This field is used to define the rate in which the sensor will be sampled. In most cases "Normal" should be sufficient (other rates are Fast, Faster, Fastest). The exact rate depends on the specific sensor but approximate rates are as follows:
    • Normal - ~4 Hz (4 samples in one second)
    • Fast - ~9 Hz
    • Faster - ~16 Hz
    • Fastest - ~22Hz
  • Time required to set trigger - number of seconds required to set off the trigger. To better explain what it means, let's assume we have selected the "Face Down" preset as shown in the image above, and set the "Time required to set trigger" to 1 second - in this case, only when the device is lying face down for at least 1 second, the trigger will launch.
Sensor Trigger - Advanced
There are two advanced customization modes that can be used when using the "Sensor Trigger":

Record State - Almost all sensors have a special "Sensor State" called "[Custom] Record State". When this state is selected the edit screen shows a record button between the sensor state selection list and the sensitivity bar:
When this button is pressed, AutomateIt will record the current state of the selected sensor and will display detailed info on the recorded values:

In the image above the device was lying facing up on a table, but you can use this feature to record all kinds of sensor states that are not defined as presets.

An even more advanced customization method is the Manual sensor state. When this state is selected, instead of a record button, you'll be required to enter specific values that define a sensor state. In the following example we are using the proximity sensor and its value is the distance in centimeters from the sensor (some sensors only have a near/far indication) :
To further understand what the exact values of each sensor mean, refer to the following guide.


Calendar Trigger
Calendar trigger allows your device to act once a calendar event starts or ends (Note: All day events are ignored).
The calendar trigger configuration has the following parameters:
  • Calendar - The calendar that will be monitored for events.
  • Calendar Events Filter - A filter that can be used to act on specific events (details below).
  • Trigger on event start - When this checkbox is checked, the trigger will launch on the beginning of the events matching the defined filter on the selected calendar. When this checkbox is unchecked, the trigger will launch when the events ends. If this trigger is used as part of a Composite AND Trigger, this checkbox acts as a during/not during indication.
  • Refresh Rate - Since the calendar events might change, this trigger requires refreshing once in a while to keep track of the updated upcoming events. By default this is set to 4 hours. (Default value can be changed from the Settings screen).
When using the Calendar Events Filter, there are two parameters that can be used to filter matching events:
  • Filter show me as... - Only trigger on events with the selected "Show me as" status - can be Busy Only\Available Only\Busy or Available.
  • Event title filter - Filter events by their title. Can be an exact match or partial match by checking/unchecking the "Title exact match" checkbox.

Pro version reviewes
Liked it ? Loved it ? Help me keep improving it...
(Donation is also available from the About screen in the Pro version)